Tuesday, July 12, 2022

Using Data Validation and VLOOKUP in Excel TIP


Doesn’t it get redundant when you use VLOOKUP function in Excel with a large data table  and you have to type in the Lookup value each time you need a new one to look up? 

Try using Data Validation List option in Excel along with your VLOOKUP function.

For this tip I am using a sample data table that lists SKU data information.  Let’s say this is a very large table and I need to look up SKU specific number information. 

The headings from the table has been typed starting with cell I2:M2.


1.      In cell I2, I typed  the function =VLOOKUP(Table1[@SKU],Table1[#All],1)

2.      Select the Data tab and choose the Data Validation option. Select Data Validation from the list.

You should see the following as shown in this window:


3.      Choose List from the Allow drop down menu.  Select the SKU list A2:A19.


4.      Now you can repeat the VLOOKUP formula for each column heading.  With the drop down you can now select the SKU number and populate all the columns with the correct data from your lookup table.


Thursday, July 7, 2022

Using Microsoft 365's To Do App with Flagged Emails from Outlook

If you have trouble setting and reaching goals, making decisions about what to focus this  digital tool can keep you productive and motivated.

Use a Microsoft Office 356's to-do list to create and store all your individual tasks in one place—in essence using it as a smart daily planner. Create your tasks and sub-tasks in the app and make them meaningful by adding descriptions, photos, and files for reference. Simply open the app at the beginning of your day and it will help you map out everything that must be completed. Over time, this app will help you track your existing behavior patterns to create more productive habits, providing personalized suggestions on the most critical priorities for the day. Set up reminders for certain tasks, which will keep you accountable and more intentional about prioritizing your workflow. As well as adding flagged emails to your to do list.

To manage your flagged email directly in Microsoft To Do, sign in with the same work, school, or personal Microsoft account that you use for email.  

Note: This feature is only available if you’re using an account that’s hosted by Microsoft, such as an Outlook.com, Hotmail.com, or Live.com account. It’s also available if you’re using an account hosted by Microsoft but using a custom domain. 


  1. To see your flagged email tasks, navigate to the list menu, then select Flagged email > Create
  2. Alternatively, you can turn the list on in Settings. 

Once turned on, email flagged in Outlook will appear as tasks in Microsoft To Do. The task's name will be the subject of the flagged message and will include a preview of the email's text in its detail view. To open the original email, select the option to Open in Outlook from the task's detail view.  

Items in the flagged email list can be renamed, assigned due dates and reminders, added to My Day, and marked as important. 

Note: The flagged email list only shows tasks from messages flagged in the last 30 days. It’ll show a maximum of 100 of your most recently flagged messages.

Flagged calendar events won’t be converted to tasks in To Do and won’t appear in the flagged email list. 

Good Luck! 

Monday, May 16, 2022


Directly Create Drop Down List In A Word Document

Please do as follows to create drop down lists in a Word document.

1. In the Word document you want to insert drop down list, click File > Options.

2. In the Word options window, you need to finish the below settings.

  • Click Customize Ribbon in the left pane;
  •  Select Commands Not in the Ribbon from the Choose commands from drop-down list;
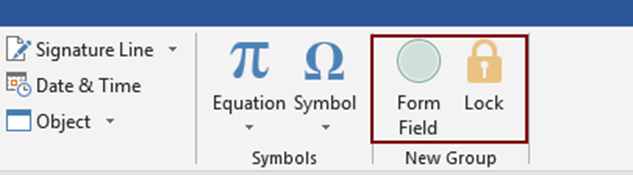
  • In the right main tabs box, select a tab name (here I select the Insert tab), click New Group button to create a new group under the Insert tab;
  •  Find and the Insert Form Field command in the commands box;
  • Click the Add button to add this command to the new group;
  •  Find the Lock command in the commands box;
  • Click the Add button to add this command to the new group too;
  • Click the OK button. See screenshot:


Now the specified commands are added to a new group under the certain tab.


3. Place the cursor to where you want to insert drop down list, and click Form Field button.

4. In the Form Field dialog box, select the Drop-down option and then click OK.


5. Then a form field is inserted into the document, please double click it.

6. In the Drop-Down Form Field Options dialog box, you need to:

  • 6.1) Enter a drop down item into the Drop-down item box;
  • 6.2) Click the Add button;
  • 6.3) Repeat these two steps until all drop down items are added into the Items in drop-down list box;
  • 6.4) Check the Drop-down enabled box;
  • 6.5 Click the OK button.

7. Click the Lock command to enable it. Then you can choose item from the drop down list now.


8. After finish selecting, please turn off the Lock command in order to make the whole document editable.

Note: Every time you want to choose item from the drop-down list, you need to turn on the Lock command.


Wednesday, April 27, 2022

Setting up Calendars in Microsoft Project

Why it is so Important to Set up Calendars First in Microsoft Project

Although Microsoft Project’s base calendars are an excellent starting point, you will likely need to make customizations for your project. Luckily, the Change Working Time dialog box provides a central location to modify the calendar, set holidays, and more.


Understanding the calendars

There are three different calendars in MS Project

  1. Project calendar - defines default work days and hours
  2. Task calendar - used when the timing of a task must be different than the project calendar allows
  3. Resource calendar - defines when resource is available

MS Project has rules how the calendars interact:

  • if a task has no resources and no task calendar, it will use the working days and times in the project calendar
  • if a task has a resource, it will use the working days and times fro the resource calendar for that task's resource(s)
  • if a task has a task calendar, it will use the working days and times from that task calendar
  • if a task has a resource AND a task calendar, it will use working days and hours the task and resource calendars have in common (unless the Ignore resource calendars option has been set for the task)

If the working day is adjusted on the standard calendar, be sure to adjust how many hours is in a day in the calculation MS Project uses.

Define the Project Start Date

When you create a new project, Microsoft Project inserts the current date as the start date by default. If your project is going to start on a different date, you should change it .

You can define a project finish date instead of a start date. This is useful if your project has a stringent finish date; however, You should use the default start date if you are new to Microsoft Project. Refer to figures I and II below, which illustrates changing a project’s start date.

Figure I

Figure II


Define Your Project Calendar

All tasks and resources in Microsoft Project follow a calendar. A Microsoft Project calendar can be used for specifying holidays, as well as working time.

Microsoft Project includes three base calendars by default:

  1. Standard: Defines working time between 8 AM and 5 PM, with a one-hour break at 12 PM.
  2. 24 Hours: Defines working time between 12 AM of first day and 12 AM of next day, with no breaks.
  3. Night Shift: Defines working time between 11 PM and 8 AM, with a one-hour break at 3 AM.

You should define your own project calendars, although you can base them on one of the above provided calendars. Include your organization’s holidays and working time in your calendar(s) and assign them accordingly to project resources.

Refer to the figures III and IV below, which show how to define a project calendar.

Figure III

Figure IV

It is a good idea to take the Microsoft Project classes at Lady Ray Computer Services LLC.  Please check out the schedule for the Microsoft Project at our website, www.ladyraycomputer.net.


Tuesday, March 1, 2022


For more information, please contact us at contact@ladyraycomputer.net


Wednesday, May 12, 2021


Cloud-to-cloud migration allows an organization to switch cloud computing providers without first transferring data to in-house servers. Having the ability to move easily between cloud providers is an important consideration when choosing a cloud provider.

A unified approach to cloud migration Microsoft's  Azure


Get all of the Azure migration tools and guidance you need to plan and implement your move to the cloud—and track your progress using a central dashboard that provides intelligent insights.


Cloud Migration: A Guide to Building Resilience (azureedge.net)


Wednesday, October 14, 2020

Split Out One Cell into Two Cells

Let’s say, for example, that you have entered the full names of the contacts you have at a company in one column and you now require to have that information split into two columns, first name and last name.

Rather than re-entering all the data again, Excel can do this for you.

First highlight the column you want to split into two. Next go the ‘Data’ tab in the top ribbon and click ‘Text to Columns’ in the data tools section.
A pop up will appear asking you to confirm if Excel has selected the right split method for your data.

For this example, ‘Delimited’ is correct, as this what you would use to break up a column based on spaces, tabs or characters like commas.
Click next to choose your ‘Delimiters’ to split your column.

For this example, we want to use ‘Space’ as this is the gap between the first name and last name.

Click finish and your column of full names is now split into two columns containing the first name and last name of your contacts.


Combine Cells Easily with Formulas

So, what if you want reverse the above and combine some data into one cell? The quickest way to combine data into one cell is using the simple ‘&’ sign in a function.

Let’s take the names we have just spilt into two columns in the previous example.

We now have the first name and last name split in columns A and B. Let’s recombine those in column E where we need them to be.

First select the cell in the column where you want the combined data to go, then go to the function bar and enter then function: =B5&” “&C5

This formula tells Excel to do the following:

B5 is the location of the first name and C5 the location of the last name we want to combine.

The ‘&’ character is what creates the combination.

The two quotation marks “ “ are important, as this tells Excel that you want to add a space between the combined cell data. If we did not add these quotation marks, you would not get the space between the persons first and last name.

To then easily do this for all the rows in our example table, just drag the corner of the cell as we did in tip 2 above.

Easy.

Excel tips and tricks, mastering functions


Why We Distrust AI Errors—and How to Build Trust

    Why We Distrust AI Errors—and How to Build Trust Keywords: AI trust, algorithmic aversion, ethical AI, explainable AI, buildi...