Tuesday, August 2, 2022

Creating Webinars in Microsoft 365 Teams


Create Webinar in Teams Video

How webinars are different from ordinary meetings

Ordinary meetings generally include a lot of back-and-forth among the participants: discussions, sharing, assigning and accepting tasks, making plans, maybe coming to a consensus.
Webinars, on the other hand, are more controlled, and the participants have clear roles: One or several experts (the presenters) share their ideas or provide training to an audience (the attendees).

Webinar steps

Set the day and time, invite additional presenters, and create the registration form that prospective attendees will fill out. For a webinar overview, see Get started with Teams webinars.

If you run into any issues, contact your IT admin.

Enter webinar details for presenters

  1. In the Teams calendar, select the arrow to the right of New meeting and then select Webinar.
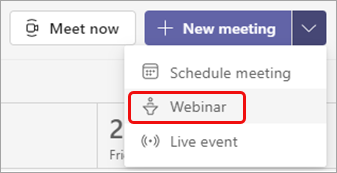
    Select Webinar, the second option

  2. By default, the webinar is open to everyone. You can change it to For people in your org by selecting the down arrow next to Require registration.
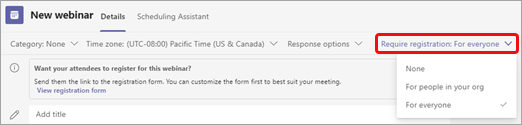
    Select Require registration under Meeting options

    Note: If you want to schedule a public webinar but can’t, contact your IT admin.

  3. On the New meeting page, enter a title for your webinar, date, start and end times, and a description. The info that you enter on this page is for the webinar presenters only—attendees won’t see it. If you want, you can set a different start time for attendees on the registration form so that you’ll have time to prepare with the presenters before the attendees join. (See Customize the registration form for instructions.)
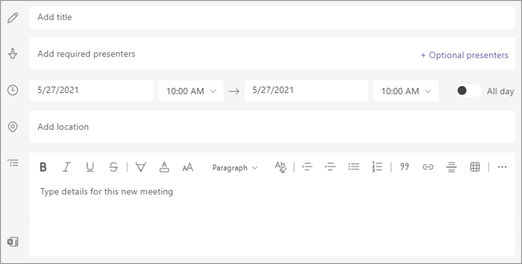
    Fill in the basic info

  4. In the meeting notes section at the bottom of the invitation, you can add agenda items and notes, and assign pre-webinar tasks to the presenters. This info is shared only with presenters.

Add other presenters (optional)

To allow people besides yourself to present content during the webinar, list them on the invite. Presenters don’t need to register. They join the webinar in the same way that they join a regular meeting.
  1. In the Add required presenters space, enter their names.

  2. Add required and optional presenters

  3. If there are optional presenters, select Optional presenters and enter their names.

Customize the registration form

Potential webinar attendees get this form when they select the webinar registration link. They fill it out and submit it to receive the Join link for the webinar.

  1. To begin, select View registration form.

    Select View registration form

Add a custom image (optional)

You can add a banner or other image to the top of the attendee registration form.

  1. Select Add an image at the top of the page.

  2. Select Upload an image, locate and select the image you want to use, and select Done.

  3. Select Done again.

To remove the image, select the X in the upper-right corner of the page.

Enter basic webinar details for attendees

Enter the webinar title, date, start and end times, and description. You can also list the speakers, along with their bios.
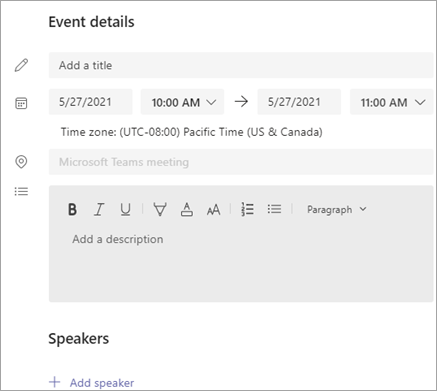
Event details section

  • The info that you enter on this page appears only on the registration page—it does not affect the start and end times on the webinar calendar event.

  • If you want, you can set a different start time for webinar presenters so that you’ll have time to prepare with the presenters before the attendees join.

Choose additional fields

The form that attendees will complete includes three required fields: First name, Last name, and Email. You decide the rest.

  1. Under Register for this event, select Add field to view a list of commonly requested fields.
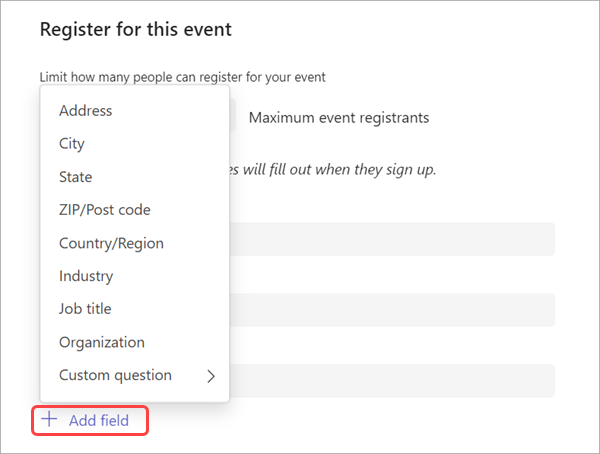
    Select Add field

  2. To add one of the listed fields, select it.

  3. When the field appears on the form, select the Required box if you want to oblige attendees to provide that info. (They won’t be able to register for your webinar if they leave the line blank.)
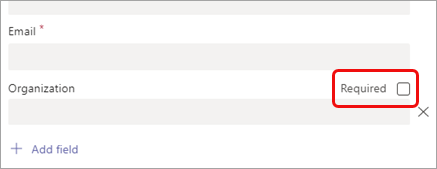
    Required check box is next to Organization

  4. Repeat steps 1-3 as needed. To delete a field, select the X to its right.

Create custom fields

You can request any amount of additional info, perhaps related to your webinar's marketing goals or to help plan your training session.

  1. Select Add field > Custom question and indicate whether the attendee will be entering info in the questionnaire (select Input) or choosing from options you supply (select Choice).
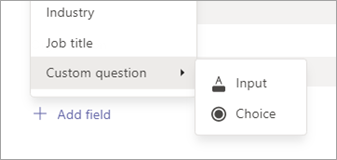
    Select Input or Choice

  2. If you chose Input, enter your question in the field under Custom question.
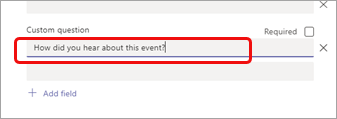
    Input is the top option

  3. If you chose Choice, enter your question under Custom question, select Add option until you have the number of choices you want to provide, and then enter the choices.
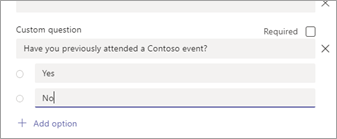
    Choice is the second option

  4. To preview your registration form, select View in browser at the top right of the page.

  5. When you’re done, select Save.

  6. To close the form, select the X in the upper-right corner.

Note: The registration form is created as a web form on the organizer's Mysite on SharePoint. Registrants will enter their registration data through a TLS-encrypted connection between their browser and the SharePoint service. When a registrant submits a registration, SharePoint stores the data, encrypted, directly to your organization's SharePoint data storage location as a list on the organizer's Mysite.
Organizers can respond to requests from registrants to exercise data subject rights by directly accessing their registration lists in SharePoint. Admins can use the DSR guidance provided at Office 365 Data Subject Requests for the GDPR and CCPA. Any data processing needed for purposes of this webinar is subject to the terms of the meeting organizer.

Send the invite

After you’ve completed the basic info for both presenters and attendees, added any additional presenters, and customized the registration form, send out the invite.

Important: You need to do this even if you’re the only presenter.
Select Send in the upper-right corner of the page.
The presenters will receive the invite.
The registration link will become active so that prospective attendees can register.
Add presenters after sending the invite
When you add presenters to the webinar after you’ve sent the invite, you must give them permission to present. You can do this by changing a meeting option before the webinar or by changing their role during the webinar.

Note: To add an external (guest) presenter, follow the second procedure.
To add a presenter before the webinar:
Select the event in your calendar and then select Edit.
Add the new presenter to the Presenters or Optional presenters line in the invite.
Select Send update in the upper-right corner of the screen.
Select the event in your calendar and then select Edit.
Next to Go to meeting options, select Change options.

  1. Select Change options to the right of Go to meeting options

  2. On the Meeting options page, next to Select presenters for this meeting, enter the name of the additional presenter.
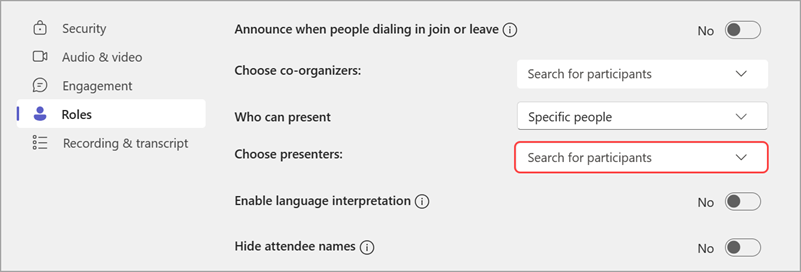
    Select Specific people (the third option)

  3. Select Save at the bottom of the page.

To change someone's role during the webinar:

  1. Send the webinar join info to the person who will be presenting. The info is available towards the bottom of the webinar event in the calendar, under Microsoft Teams meeting.

  2. At meeting time, let the presenter into the webinar.

  3. Click Show participants in your meeting controls to see a list of all the people in the webinar.

  4. Point to the name of the person whose role you want to change and select More options > Make a presenter.


Monday, August 1, 2022

Using Microsoft 365 Forms to create Surveys, Quizzes or Polls


Create a form with Microsoft Forms

With Microsoft Forms, you can create surveys, quizzes, and polls, and easily see results as they come in.

 Creating a quiz

·       Web One Drive for work or school Excel for the web OneNote for the web

·       Start a new form

·       Go to Microsoft Forms with your Microsoft 365 school credentials, Microsoft 365 work credentials, or Microsoft account (Hotmail, Live, or Outlook.com).


Note: You can also log in to Office.com, look for the Microsoft 365 icons on the left, and then select Forms.

 ·       Select Add buttonNew Form.


·       Title your form and, if you want, a description of it.


Note: Form titles can have up to 90 characters. Descriptions can have up to 1,000 characters.

 Note: Your form is saved automatically while you create it.

 Add questions

·       Select  Add buttonAdd new to add a new question to your form.


·       Choose what kind of question you want to add, such as Choice, Text, Rating, or Date question types. Select More question types  for Ranking, Likert, File upload, or Net Promoter Score® question types. To organize sections for your questions, select Section.


Tip: You can also format your text. Highlight a word or words in your title or questions, and then choose any of the following: Bold (keyboard shortcut - CTRL/Cmd+B), Italic (keyboard shortcut - CTRL/Cmd+I), Underline (keyboard shortcut - CTRL/Cmd+U), Font color, Font size, Numbering, or Bullets.

Important: If you delete a question, it will be permanently deleted along with any response data that's been collected for it. Learn more.


Preview your form

·       On a computer, select  Preview iconPreview to see how your form will look. On a mobile device select Preview icon to see how your form will look.


·       To test out your form, answer the questions in Preview mode, and then select Submit.


·       To keep editing your form, select Back.


FFFor information on Training or Productivity solutions contact us at 844-523-9729 or visit our website at www.ladyraycomputer.net


Friday, July 29, 2022

Freaky Friday Tips for Microsoft 365 - Convert a Calendar Meeting in Outlook to an OneNote item


Next up in our line of Microsoft 365 tips and tricks is that Outlook Calendar can be easily transformed into an item in your OneNote app, complete with deadlines and reminder notifications.


1.     Select the item (Meeting) and then select the Send to OneNote icon


2.     Select location.


3.     Click OK.


You can also convert OneNote items into meetings in your calendar, so you never miss an important date.

Stay Tuned for more Freaky Friday Microsoft 365 Tips.


Thursday, July 28, 2022

What is Shifts?

Shifts Video 

With Shifts in Microsoft Teams, create a schedule, assign shifts to your team members, copy and reuse shifts, and add open shifts.


Shifts in Microsoft Teams is a schedule management tool that helps you create, update, and manage schedules for your team. 

  • Schedules - Create, edit, and manage a schedule with Shifts in Microsoft Teams. A Shifts schedule displays days at the top, team members appear on the left, and assigned shifts appear in the calendar. 

  • Groups - Name a group like a job type or location to keep your groups organized. 

  • Shifts - Choose where to add a shift. Create it from scratch, or copy an existing one.

  • Open shifts - Each schedule has an open shifts row. Add open shifts to your schedule that anyone can request. 

  • Time Clock - Time Clock lets your team clock in and out of a shift with a mobile device.

  • Requests - Review requests for time off, shift swaps, or offers. 

Schedules and groups

  1. To create a new schedule:

    • Select Create a new schedule to build one from scratch.

    • Select View to choose an existing schedule.

    • Select Create on the team you want. You must be a team owner to create one. 

  2. Select Add group to organize your schedule based on a job type or location. 

  3. To name the group, select More options  > Rename group, type a group name, and then select Save.

  4. To add people to a group, select Add people, choose someone, and then select Add. 

Create a shift for a team member

  1. To create a shift for someone, select their row, and then select More options > Add shift.

  2. Add or edit start and end times, a custom label, break times, shift notes, and activities, and then select Save.

Copy a shift

  1. To reuse the same shift across your schedule, on the shift, select More options  > Copy. Or, press CTRL + C. 

  2. To include shift activities, turn the Always include shift activities when copying shifts toggle On, and then select Done.  

  3. To paste, choose an empty slot and select More options > Paste. Or, press Ctrl + V.

Add an open shift

  • Choose a day, and then select More options > Add open shift.

  • If you need to copy or switch to another schedule, select Copy schedule, or select the menu  and then choose a shift to switch to.

Tuesday, July 26, 2022

Microsoft 365 Tips in Productivity for Busy Executives


Looming deadlines, an endless flow of information, and multiple tasks demanding our constant attention, we often feel unfocused, overwhelmed, and ineffective. In other words, we experience “executive skills malfunction.”

“Executive functioning” is the term psychologists use to describe how our brains work—specifically, the cognitive skills we use to organize our professional and personal lives, to make plans and then execute on them.

Unfortunately, the executive function part of the brain doesn’t always work the way we want it to. Oftentimes, our capacity for complex thinking and getting things done shuts down. We lose our ability to control our impulses and emotions, and to adjust our behavior positively to unexpected changes. Moreover, when this happens in a group or team, the ripple effect is an organizational culture where everyone is regularly working reactively rather than proactively.

Improve your organizational skills

At its peak capacity, your executive function helps you efficiently organize your thoughts and ideas. But if you’re consistently struggling to keep track of important information and relying on chaotic systems to stay on top of things, the following solutions are essential.

  • OneNote is a great alternative to writing your ideas down or mapping things out visually on paper. It also helps you save, organize, and access all your memos in one secure place. Store your notes in a variety of formats, including hand-written texts, drawings, charts, and tables—as well as audio files, images, and videos.
  • Microsoft List provides a simple and flexible way to manage the work data that matters to you and your team. Create, share, and track issues, contacts, and inventory to keep everyone aligned around what’s happening. For example, if your business loans laptops and smartphones to employees, use your app to create an asset list, noting who has each device, their assigned product number, and the date they were first assigned that product. Start quickly with ready-made templates or spreadsheet files, see recent and favorite lists, and even add photos with QR code support.
  • Streamline planning, prioritization, and task management

    If you have trouble setting and reaching goals, making decisions about what to focus on now versus later, and just getting started on tasks, these digital tools can keep you productive and motivated.

    • Use the Microsoft TO DO app create and store all your individual tasks in one place—essentially using it as a smart daily planner. Create your tasks and sub-tasks in the app and make them meaningful by adding descriptions, photos, and files for reference. Simply open the app at the beginning of your day and it will help you map out everything that must be completed. Over time, this app will help you track your existing behavior patterns to create more productive habits, providing personalized suggestions on the most critical priorities for the day. Set up reminders for certain tasks, which will keep you accountable and more intentional about prioritizing your workflow.

    • Microsoft 365 Planner is an intuitive tool that uses Kanban boards and task notes packed with files, checklists, and labels, providing you with just enough information to overcome indecision and keep moving through your workday. It also offers many useful features—such as visual insights, email notifications, and the ability to assign individual tasks—to help you and your team avoid chaotic workflows. By following a structured checklist and crossing off completed tasks, you’ll fight procrastination and gain a sense of achievement.
    • Microsoft 365 Outlook is an essential tool for improving your ability to plan and prioritize. It helps you structure your time effectively with a comprehensive view of the days, weeks, and months ahead. Color code your calendar to schedule regular breaks in your day to spend time away from your devices or allot focus time for strategic thinking and deep work. Manage expectations by using a solution that shows your team when you’re busy and when you’re available.  
  • Excerpt from Digital productivity tools to maximize your executive function skills Microsoft 365 Team May 12, 2021

  • Contact us for a free 30 minute consultation on your productivity needs.

Why We Distrust AI Errors—and How to Build Trust

    Why We Distrust AI Errors—and How to Build Trust Keywords: AI trust, algorithmic aversion, ethical AI, explainable AI, buildi...